Richard Manning
Black Sabbath Technical Ecstacy 1976
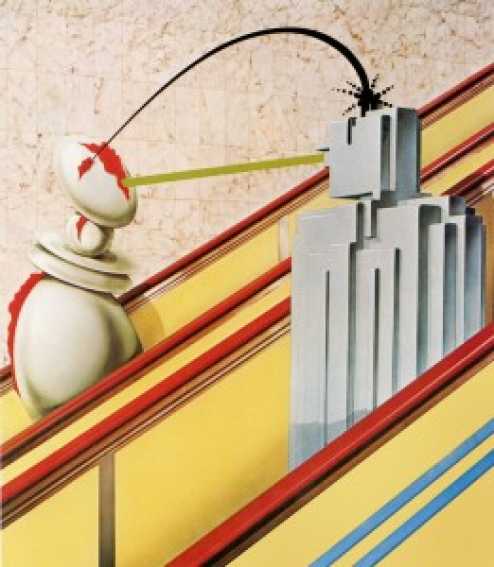
I received a Dye Transfer of the escalators that had glass sides, along with a trace and position guide of the Robots, obviously male and female, designed by George Hardie. I traced the Robot shapes onto the Dye and masked off all but the glass sides. I bleached them to white and then, having mixed the yellow ochre-ish colour in Photo Dye, with a swab of very wet cotton wool, soaked the exposed area, then with another piece of cotton wool soaked in the dye, proceded to wash in the colour, watery cotton wool in one hand and watery dye cotton wool in the other keeping the washing motion going to achieve an even tone as the colour gradually soaked in. Once I was happy with the colour I airbrushed a darker tone in the bottom right and then airbrushed the soft cast shadow in front of the male Robot. The shadow cast by the female Robot onto the side of the escalator was achieved by holding a curved shape slightly raised from the print, and airbrushed to achieve a soft edge. And the same process for the male Robot, but obviously not with a curved shape. The blue stripes were masked and washed in and a darker brush rule added to give depth. The handrails masked and red dye washed in onto the existing image with no bleaching.
Each segment of the female Robot was masked separately and airbrushed with a colour mixed in Photo dyes, the stronger highlights on the left side were in some cases masked and carefully washed out. The red areas, again masked and bright red dye washed in to give an even colour, and the Sable brush with weak red and black mixed for any modelling.
The Male Robot was masked as one piece and a base tone grey sprayed overall. I managed to replace the mask and then cut away all the shaded areas on the right hand side so as to spray a darker tone to give the three dimensional effect. I then concentrated the airbrushing to each individual section by positioning pieces of paper over the other sections as protection. In this way, by spraying one piece at a time then repositioning the paper and spraying the other parts meant I didn't have to keep cutting transpaseal masks. As you can imagine every time something was masked and cut there was always the risk of cutting into the print with disastrous results. Every time bleach was used it weakened the surface of the print, and then when a bleached area had transpaseal laid over, there was always the risk, when peeling the mask away, the surface of the print might peel away also. Not good. Luckily (for me anyway) no disasters happened. The mask was removed from the Robot and then I brush ruled, with watery grey, down each side section. The highlights on the top edges of each segment was achieved by gently knifing the sprayed base grey away. The green and black beams between the Robots was masked and dye washed in.
Finally I had to draw in about half an inch of the tiled background. I decided the best way was to follow the grout line of the tiles. Right, more transpaseal! So from the left hand side I cut the transpaseal along the bottom line of the first full tile to the sixth tile, then cut up the side towards the top of that tile, and then turn right and cut in a straight line across to the right hand edge of the print on. So the image actually finished a sixteenth of an inch above the top right corner of the sixth tile, leaving a straight cut off line over the width of the print. I carefully softened the harsh line with a weak solution of Potassium Permanganate and Sulphuric Acid, neutralized with Sodium Metabisulphate and washed with Acetic Acid. I mixed a watery tile base colour, wet the print with water and then by adding a drop of Photoflo to the dye, washed in the colour with a large Sable brush. Blotted any excess liquid and while the print was still damp, painstakingly put in the marble effect with a combination of my smaller Sable brush and fine line airbrushing. I used Watercolour paint, a mixture of Raw Umber and Sepia, for the darker squiggles because paint was more controllable for small dark areas as against dye, as the dye was more likely to spread out from a tight sprayed line. Once satisfied with the result, a gentle spray of Gum Arabic to the Watercolour squirts to lose the matte effect of the paint.
Hipgnosis Album Art


All works © Richard Manning 2000 - 2026